


TWO BUTTONS JOYSTICK FOR
SPECTRUM
Who did not dreamed at the time of the Spectrum to have a joystick with two
buttons to be able to launch the Operation Wolf or Ikari Warriors bombs
without having to release a hand to strike the keyboard? With this easy and
simple assembly we can finally turn our desires into reality in a very
simple way and without modifying the game code.
What we are going to do during this article is to modify the connection of
our joystick to the computer. The assembly has been done based on an arcade
joystick like the Telemach, which are very comfortable to work for the free
space that are inside.
REQUERIMENTS
- ZX Spectrum +2/+2A/+3 and any other models equipped with a
two-player Joystick adapter as then Interface 2, Turbo Turbo and other
similar ones that uses Spectrum key values for their operation.
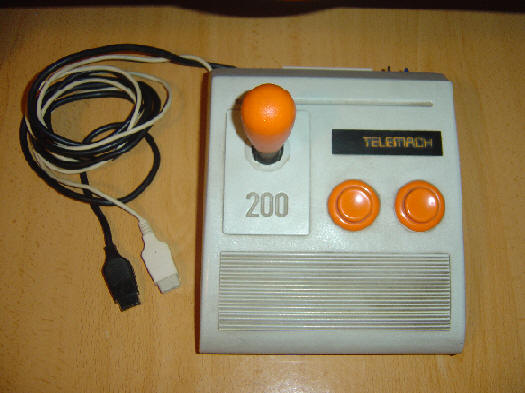
- Joystick with two fire buttons. In this case a Telemach 200.
MATERIALS
- Female DB9 Connector
- Some cable with two wires.
ASSEMBLY INSTRUCTIONS
What we are going to do is provide a second connector that will go to the
free joystick port of our Spectrum, and that will be connected directly to
the second button on the joystick.
Original connector provides each of the coordinates of the command with a
key, for example 6/7/8/9/0. The second connector will be used to
independently assign the second button to any of the signals that are
available through the other port, that is, in the same joystick we can have
the 5/6/7/8/9/0 keys assigned . We only have to load the game and use the
"redefine keyboard" option to make our wishes come true, so easy ....
STARTING TO WORK
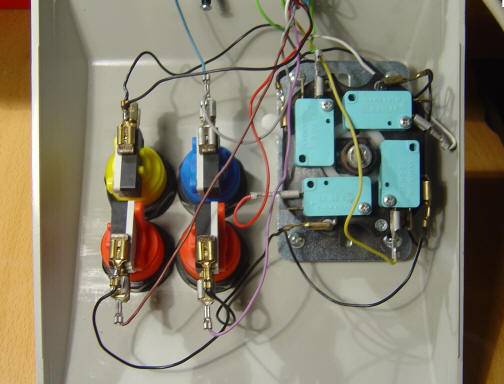 |
Inside a NES Telemach 200
|
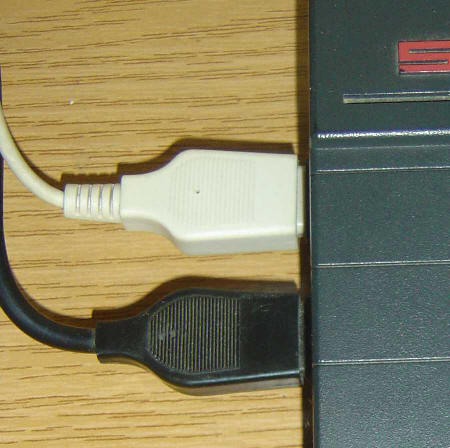
The only thing to do is to isolate the button that we choose by cutting
the two wires that are connected and solder two wires of the new cable
that we are going to add in the same place. At the other end we will
connect the new connector that will go to the second joystick port of the
Spectrum. One of these wires is the signal of one of the joystick port
coordinates and the other is the ground of the same port.
 |
Double cable output
|
The ground is common to all joystick switches and is usually bridged from
one to another. Ensure that the ground of the joystick and the ground of the
second button are completely insulated or it will not work properly.
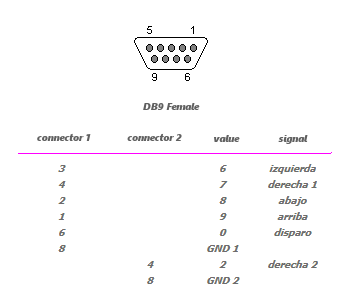
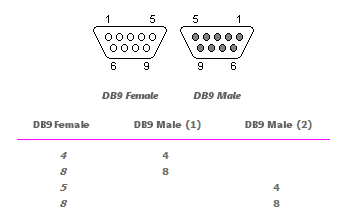
Connections scheme should be as follows:
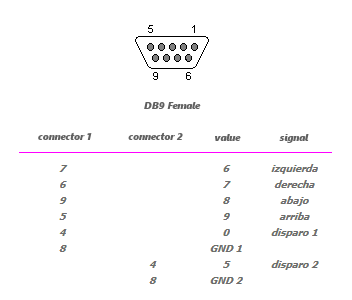
|
 |
| SJS
pinouts (+2/+2A/+3) |
Atari
pinouts (Interface 2, RAM Turbo...) |
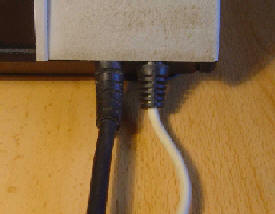
PLAYING WITH NEW JOYSTICK
Once built we place the two connectors of the remote control in each of the
joystick ports of the Spectrum.
Now go to the Spectrum BASIC and press each of the Joystick coordinates. If
you have used the connection scheme of an SJS joystick, the numbers
5/6/7/8/9/0 should appear. If it is of the Atari standard, the numbers
2/6/7/8/9/0 will appear.
 |
| Joystick connections on
Spectrum +3 |
Now everything is ready. Obviously the only thing necessary in a game to
use the joystick is a game with redefine keyboard option. Now we have a
second button available on the remote to assign it to that extra key.
You can find a game that does not allow you to use the numeric keys to
redefine the controls of the game, so the assembly is not valid.
Fortunately, mostly works without problems.
 |
A modiffied Telematch 200
|
TWO MODIFFIED JOYSTICKS SIMULTANEOUSLY
It is possible to use two modified joysticks simultaneously, and be able
to play doubles with two fire buttons for each player, but the
requirements increase:
- Only for +2/+2A/+3 models.
- We must have a Kempston joystick adapter connected.
- The game must allow the option to redefine for a player. For the other
player, the use of the kempston joystick and the redefinition of the
second button key must be allowed.
We must have two modified joysticks with the assembly explained, but one
following the connection scheme of the SJS standard and the other with the
Atari standard.
With kempston interface attached to the Spectrum we have a total of three
joystick doors available and we need 4, so now we have to make an adapter to
divide one of the doors into two parts. The necessary material is:
- 1 x Female DB9 connector
- 2 x Male DB9 connector
- Some cable with two wires.
 |
Adapter pinouts
|
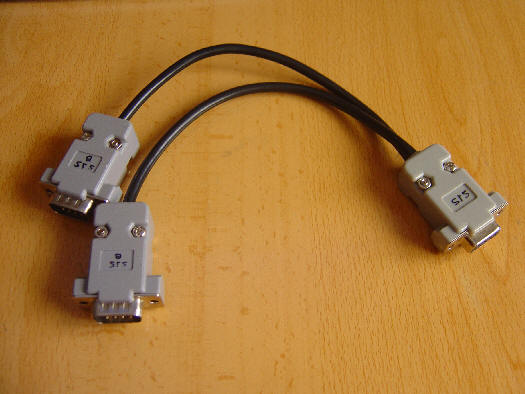 |
| The built adapter |
Only remains to connect it as follows:
- The adapter must be connected by the female DB9 to the Sincair
joystick port 2 of the Spectrum.
- The Atari standard joystick takes its main connector to the kempston
adapter and the other one connected to one of the DB9 male connectors of
the adapter.
- The SJS standard joystick takes its main connector to the
Sinclair joystick port 1 of the Spectrum and the other one
connected to the other DB9 male connector of the adapter.
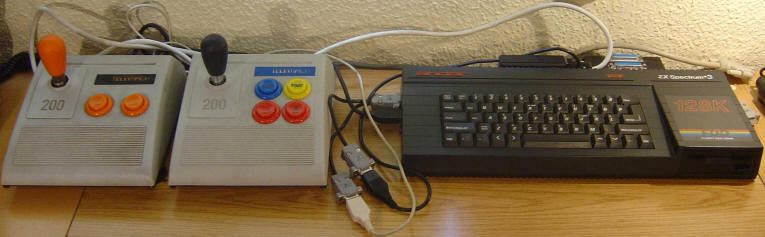 |
| Both joysticks modified,
connected and ready to be crushed |
The adapter is responsible for collecting the signals from the second
button of each joystick and assigning one of them to a different signal
from the joystick port. If you move both joysticks through all their
coordinates, the numbers 4/5/6/7/8/9/0 should appear on the screen. The
kempston joystick will not mark anything.
Now we can load a game, for example Ikari Warriors. The player with SJS
joystick will choose to redefine keyboard and the other player with Atari
standard joystick will choose kempston and use the second button to redefine
that special game key.
It is a bit more complex, but it is an option that is available if you
want to use it, and it may be useful for you to take advantage of two
buttons facility on two players games.


